I have been taking cuttings from coleus several times and Here in this HOWTO I am going to explain how easy this process is and how to multiply the coleus plant you have in following steps with pictures. I hope you enjoy.
Requisite:
- Coleus stem tip cuttings [ Approx 4 inches in length]
- Potting mix.
- Root promoting hormone. [IBA]
- Containers
- Polythene bags
- A razor blade
Step 1: Collect coleus cuttings.
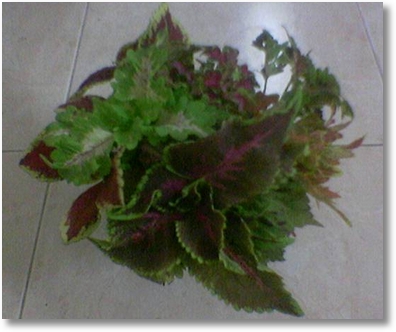
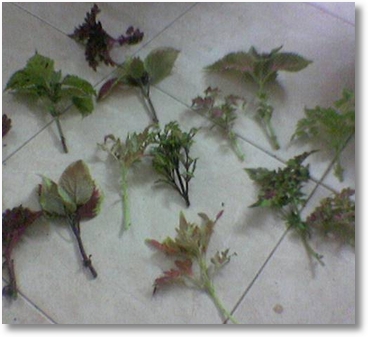
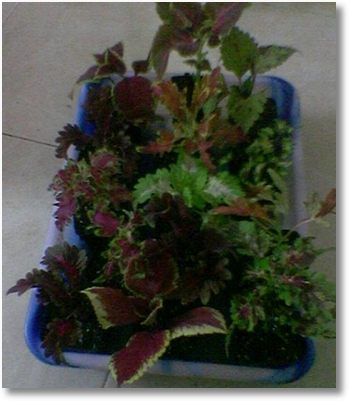
The first step is to go around the garden and find out what plants you want to take cuttings from. Those plants must be healthy and disease free. Once you have spotted a plant, then using a razor blade take the cuttings from the stem tip such that the cuttings are approx 4 inches long. If you have many varieties of coleus then you will end up with something like the pictures below.
Once you cut the stems, put them in a glass of water like above till they are inserted into the propagation medium. This helps them to remain fresh and they wont droop.
Step 2: Prepare the cuttings.
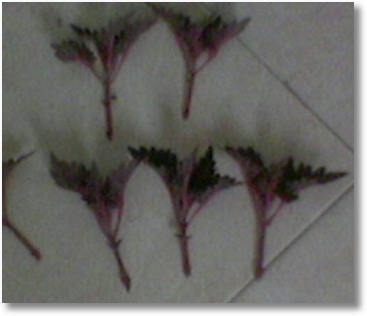
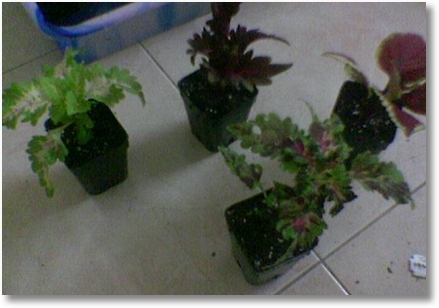
For all the cuttings you have taken, make sure that you remove the leaves that arise from the bottom most node( Place where the leaf is attached to the stem). Once you have removed all the leaves on the last node, make a cut just a centimetre below the node. If you do it just right, you will have your cuttings look like this.
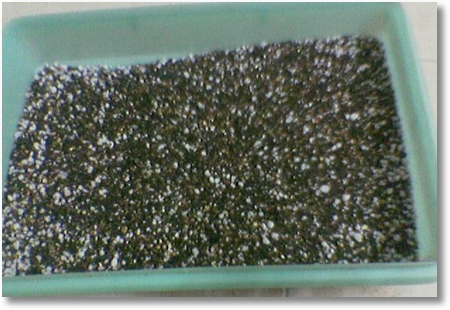
Step 3: Prepare the medium
The best medium I have found to give good results is a mixture of Coir dust, Sand, perlite in equal proportions. Any other well drained medium should also be fine. Ensure that the medium is free from any fungal infection. Make the medium moist but not so soggy wet. Let the medium drain.
Step 4: Stick’em in.
Now, take cutting by cuttings, and dip them in the rooting hormone ( this speeds up rooting a little bit). I have a solution called “Quicroot”. Any other standard rooting solution should be fine as well. Using your dibber, make a hole in the medim so that the bottom most node of the cutting is totally inside and its deep enough to not let the stem cutting fall off. Stick the stem cutting in to that hole and gently press the surrounding medium.
Step 5: Make a mini greenhouse
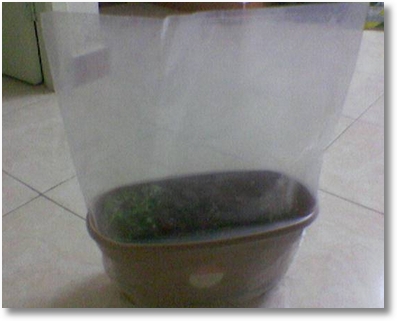
Once the cuttings are inserted into the medium, prepare a mini green house to keep the cuttings fresh and to not lose moisture. I took a window planter and kept all my cuttings inside that and covered the whole thing with a polythene bag. The end result was something like this. If you have a green house or a propagating chamber thats cool too.
Tada! and you wait for 2-3 weeks. The end result is colony of coleus plants for your viewing pleasure.


59 Responses
hi,
do you have any similar techniques for propagating hibiscus cuttings? please tell me where i can get panchagavya and rooting hormone preparations in Chennai.
thanks
Hello Arundati,
Glad to hear that you found my blog useful. I used to have Hibiscus plants (just 5 or 6 varieties) when I was in Urapakkam (Chennai outskirts).
The same method mentioned above will work for Hibiscus too. In case of Hibiscus you need to take little hardwood cuttings. Atleast pencil-thick stems are good enough to start. Trust me! the important part here is the mini green house you make for the cuttings. It keeps the cuttings moist and fresh and this quickens the rooting process. From what I could remember, hibiscus will root in 4-6 weeks.
For rooting hormone, I have “Quicroot” that i purchased in Bangalore, I am not sure where you get that in Chennai. However, there is another rooting powder that is available in chennai is “Keradix”. This is available in most of the fertilizer shops and is also available in “Tamilnadu agriculture and Horticulture society” near Cathedral Road.
Regarding Panchagavya, I could see how curious you are, looking at your comments on all my posts. Good to see people with a similar passion. I get panchagavya from “Greenlands” owned and run by Lalitha Ramakrishnan( 044 – 24660634). You can contact her for your panchagavya needs. They also prepare “Vermiwash” that can be applied as a foliar spray after mixing with water in the ratio 1:10. Panchagavya can be mixed with water in the ration 1:33 and sprayed to plants. It acts as a pesticide and a growth promoter as well.
Let me know if you have any more questions. I will be glad to help.
hi,
Thanx for the immediate response. I have been using vermicompost for all my plants for the last 3-4 years and the efforts have not been entirely unsuccessful. I have a neighbour who is just as interested in plants as me. Both of us constantly compare notes and discuss our plants all the time- to the extent that my children complain that i shower more attention on my plants than them.
I once got some rooting hormone from Pune- but i guess it was past the expiry date. I end up spending a fortune on hibiscus plants, so a method for propagating them from cuttings will be useful.
My mornings always begin with a hello to all my plants [ more complaints from the kids]. I could go on and on……
Another problem is the mealybugs[ i presume they are mealybugs- white sticky pests on all my hibiscus ]I would have earned a phd on my efforts to get rid of them- short of brushing them off by hand to spraying all kinds of liquids on them.Now I shall try the neem oil spray-what kind of soap should i mix it with?
Awaiting your reply. Bye.
Hello Arundati,
Good to know about your passion for plants. Sometimes I get complaints too that I spend too much of my time and energy for plants. Gardening & Horticulture is my hobby and I do something less interesting as my day job and apparently getting paid for it too ;). I spend atleast first 2 hours of my morning with the plants and they make me forget everything else.
Coming to the rooting hormone. While there are many products around in liquid/powder forms. I have used keradix and quicroot. I found quicroot(liquid containing minute quantities of Indole 3-Butyric Acid[IBA]) better than keradix(powder containing 2.2% Humic acid). I have been trying to get a chemical called “Rhizopon AA#3”. Its available in USA. Might get it from my friends when they return. Thats very effective.
There is another way of propagating method that can give you 100% success but takes little more time and needs little practice. Ignore this if you knew it already. This method is called ‘Air-layering’. I have tried it once on a rare croton I had and was successful in it. You can search in google for ‘Air layering’ and you will get enough documentation to make yourself a master in it. That way you wont lose your plants and will get 100% success rate.
I can understand the frustration caused by mealybugs. I had a flowering (Nandiyavattai) plant once ruled by these aphids and mealy bugs. I first, cut all the heavily infected parts of the plant and I sprayed a mixture of a spoon of neem oil + teaspoon of dish washing liquid( i used pril) in a litre of water. After that I applied vermicompost and weekly once panchagavya spray. Now the plant is very healthy and no aphids at all. I think you can try that.
This ebook might be of some help if you didn’t know about it already.
http://www.hibiscusworld.com/howie/table.htm
Happy reading!
Hi,
thanks for all the advice, shall definitely try the air layering.now for a pest that i am not able to do anything about- bandicoots………….its very disheartening to get up in the morning and find the tattered remains of my lovingly tended plants and then my whole day is ruined.I have tried to get rid of them with ratkill – but the next one makes its appearance in a few days.
A hello to the plants is all i can manage in the mornings as i have to cook for the family, finish all household chores and leave for work by 9.30 am.So its only on weekends that i can do some gardening.
Bye for now.
Hi,
I find ur blog on gardening very useful. There is so much i’ve to learn. Though i love gardening, i’m not successful in bringing up a healthy plant. Through out the year my small garden is ruled by this white bug which stick to the stem of the plant.I think they are mealy bugs not woolly aphids.There is a tree infrount of my house which is also infected by it. As u told i’ve sprayed the neemoil and dish wash soap liquid solution. Do i have to spray this solution once in two days? The next day after spraying this i still found bugs on my hibiscus plant.
Another thing which i want to know is do i have to replace the soil mixture while repotting? I’ve not used vermicompost till now, instead i use cow dung manure and organic compost. I also use the compost i make from my kitchen waste. Is that enough for a potted plant?
waiting for ur reply
Hello Shanthi,
I had few white bugs, in my chrysanthemum plant and after their invasion the plants shoot stops growing and becomes bunchy and all you end up with is a crippled plant. I eradicated that by removing the infected part of the plant and spraying the rest of the plant with “Panchagavya”. Neem oil + Soap will also be effective but not for a long run ( as per my exp). I spray panchagavya too twice a week to keep them pest free. Neem oil spray twice a week should also be effective i guess.I could be wrong too.
hi,
regarding my personal experiences with mealy bugs,I have variously tried the following measures- if possible brush off the bugs with an old toothbrush,lightly dust the affected parts with anti-ants powder [gamaxene ]. If you have potted plants . then you can draw a laxman rekha around the rim since ants are responsible for bringing the mealy bugs to your plants.
Try these measures and let me know.
ag
Hello ,
I was searching the internet and came across another solution that uses spraying of anti-lice shampoo solution such as Mediker on the affected part of the plant. Haven’t tried myself. But sounded interesting .
Just my 2 cents.
Please post back the results so that we all know 🙂
Hello iam from AURANGABAD here i dont get (ndole 3-Butyric Acid) and other rooting harmones first of all when i asked in many fertilizers shops .about rooting harmone all of them laughed B’cause they didint know what was that ! @#$% i was embarrised .. after a lot of searching i only got (KERADIX) So plz plz tell me how to use keradix for (rose cuttings) i want to multply my rose plants ..bye
thankxx in advance]
JAI INDIA jai maharashtra
Hi omkar_don,
I could totally relate to the problem you are facing.If you go to fertilizer shops and enquire, probably they may not know. That too with the chemical name.. Here in bangalore, there is a product called Quicroot available. Keradix is good too. I am not sure if its IBA. Its 2% humic acid. All you need to do is to take your cuttings bottom end and dip it in water to moisten it and dip it in keradix such that it covers the 1 or 2cms from the cut end. Then you place the cutting in a moist media. You might want to cover the pot with a polythene bag to preserve the humidity.
good luck and keep us posted.
gg
Hi! I was surfing and found your blog post… nice! I love your blog. 🙂 Cheers! Sandra. R.
Hi GG, i saw your posts on pot grown tomatoes. very interesting. Want to know a few things. How long does it take for seeds to germinate? how many seeds to sow in a pot? Can we use regular garden soil only or have you used vermiculites etc. what is an ideal pot capacity? and lastly how long does it take before you see the ‘fruits’ of labour. sorry for the volley of questions, but the pictures really kindled my curiosity.
Hi Srividya,
Glad you liked the posts.
Regarding the time taken for seed germination, it actually depends on the type of seed, its age and the time of the year. But generally speaking, the vegetable seeds take somewhere between 5-10 days. Few seeds might show up in a couple of days and few might take a little longer. Tomato seeds germinate in 4-7 days.
How many seeds to sow in a pot.
I am assuming you are asking about tomato.They are generally tranplanted. The seeds are sown in trays or pots and they are sown thickly ( many in number). Once they reach the right transplanting size, they are transplanted to individual containers or soil beds prepared outside. For a tomato plant, the ideal container size would be 20 litres. You can grow tomato plants in containers smaller than that as well.But the yield will be less. It takes around 2 months for a plant to grow and flower. Believe me, its not like you will see happiness only when it fruits, but the joy is all along from the time you sow the seed!.
Hope this helps.
Feel free to shoot more questions.
gg
Hey GG,
I came across your blog while searching for an Indian gardening blog. I was very happy to your blog. Your post are really helpful.
Do you know where can I get quicroot in Mumbai. I want this for root propagation of hibiscus.
Hi Anil,
Did you check with Ratanshi Agro Hortitech? I think they might have. I will give you their contact soon. I dont have it handy.
gg
Thanks for a very quick reply. I bought Keradix instead of quicroot from Ratanshi agro hortitech.
Thanks,
Anil
Hi Anil, you are lucky to have got Keradix…. can you tell me how much it costed and how’s the packaging? Chennai seems to have run out of this product and it isnt available anywhere….. will these guys courier to chennai?
i seem to be having problems with my hibiscus, and like arundhati says, it’ll be good to have an auxin like Keradix than spend every time on buying plants.
Hi Srividya,
I guess they will courier keradix from Mumbai to you. It is costing Rs37/- for a 50 gram packet. Ratanshi’s phone number is 022-23723296/ 23782596. The packaging is quite okay. It comes in a plastic container which is sealed.
In case if you run into any problem do let me know.
Since you mentioned hibiscus. I am also an enthusiast on hibiscus. But, I have been able to find only two varietes of hibiscus in Mumbai. In case if you polinate the hibiscus and if you have seeds can you send it to me.
Hi Srividya,
Keradix is available easily in bangalore. If you need one let me know. QuicRoot is also available. Keradix is actually Humic acid and Quicroot is IBA ( which is an auxin).
Thanks
gg
Hi geekgarderner,
what is the price of quicroot? Would you mind couriering it to Mumbai?
thanks,
Anil Mahato
Hi Anil,
It was around 50 rs, when i bought it an year ago. Must be around the same price. I don’t have any issue sending it across.
Let me know.
gg
Thanks Anil and GG for your replies.
I spoke to the rantanshi guys, not sure they will courier it, though they say send money order and we will see….. Anil, can i have your email id pls?
GG can i take your help with quicroot? I am getting a bit desparate with the unseasonal rains in Chennai having played spoilsport with some of the Hibiscus I transplanted in a well prepared soil bed:-( The pots were so much better, i would run all of them inside if it rained heavily, now i am helplessly watching..
I also owe an update to you GG, i asked you several questions about planting tomato seeds. After a few failed attempts, the seedlings did finally appear in a vermiculite + manure medium. the progress has been quite slow (remember reading this in someone else’s response too), but i am thrilled that they showed up and 4 of them are alive. I am quite scared about transplanting them into larger pots now. The chillies appear to be sturdier plants, have grown faster and await to be transplanted..
The Okra have fared well. I’ve got about 10 okras from the 4 plants which came up and no points for guessing my elation about it. I am not analysing whether it is a good or bad yield. Pumpkings and Bitter gourd and Kovakkai have germinated, shown some leaves, yet to become big climbers!!!
This flick with gardening is teaching a great lesson in patience!
Hi srividya,
My email id is anilmahato82@gmail.com.
thanks,
anil
my nandiyavattai plants have a lot of buds, but the buds donot bloom to flowers. why?
Hi Jayasree,
It could be due to several reasons. Try adding good compost to the soil.
gg
Hi GG, is quickroot a powder or liquid? would you be able to get me some? if you can i can perhaps mail you my contacts separately. Thanks.
Hi Srividya,
QuicRoot is a liquid. I will get you one. I will send you a PM.
gg
Hi GG,
Can you please send me quicroot as well? My email id is anilmahato82@gmail.com, send me an email and i would send you my contact details.
thanks and regards,
Anil Mahato
hello GG,
i was bowsing here and there to find out a blog like this. GR8! I am a garden lover. that is not enough, precisecly iam a nature lover. i forget everything when i am doing gardening. this is the only thing i put my 100%. now i am a businessman and if there is any possibility of next janma, i want to become a farmer!
thank you,
with warm regards
manohar
Hi, can these Rootone /Seradix/Keradix/ Rootex be used to propagate allspice plant also.
Hi Tessa,
Basically any plant that will root from cuttings can be propagated using the hormones you mentioned. Keradix ( i think seradix too) is not IBA( Indole-3 Butyric Acid) but 2% Humic Acid. I have used Keradix and have got decent results. Most important part is covering the plant with polythene to save the moisture..
gg
HI,
Keradix does give decent results. I tried with a dozen cuttings of hibiscus. There were green shoots within 3 -4 weeks, (with a cover), after 3-4 leaves, i removed the cover, now i find some of the stems slowly wilting away. any clues why?
Hi Srividya,
I think the reason that wilt happened for you is stress. The cuttings that rooted with the cover need to be gradually brought out to the real world. Try removing the cover for 2 hours every morning and then slowly increase the time. This step is called Hardening.
Hope this helps..
gg
A very good site for new gardeners. the replies are useful and satisfying.Do keep it up
Biswal
Niranjan,
Thanks for the appreciation.
Hi,
Using Keradix/QuicRoot, does the African Violet leaves can be propogated. And also where can I get Keradix/QuicRoot in bangalore. Please advice. Thanks
Thanks GG. I like these AVs. Just wanted to try growing it from the leaf. And also I love lotus plants and I want to grow them too from the seeds. Just wanted to know if you know where I can get lotus seeds. I just love plants.
Hi GG,
I like plants & gardening. Just wanted to know where I can get mini ceramic pots/planters in Bangalore. Thank you
You get ceramic pots in IndoAmerican Hybrid seeds centre in KR road. http://www.indamseedsonline.com/ and also in few nurseries opposite to Lalbagh westgate.
Hi,
Have been browsing your very nice blog. Just wanted to say thanks for all the lovely pics and interesting information you put up.
Nandini
Thats very nice of you Nandini. Welcome to my blog and I am very glad that you found it interesting.
Hi,
I am interested in Jasmine probagation, after a long trace, i bought keradix today. now I am forming a mini mist house. Enquiring the mist house equipments. I found one contact info from one of the drip irrigation supplier, he quated for INR 3500 @ coimbatore where I belongs to.
My question here is, is there any other methods to probagate jasmine flowers. I need approximately 10000 Jasmine plants for my garden.
Or it will be really appreciated if anyone can let me know the technology/training required to achive this target.
Last time I planted 5000 jasmine plants and in that 20% of jasmine plant are in different shape/different verity, I dont want this happen for next time. and the verity which the supplier promissed is different than what I have now.
we do have another supplier, he is giving quality jasmine plants, but seems costly than this. he is from somewhere in Rameshwaram, but his plants are delivered without sand or packet. we need to plant in the garden within 2 days of delivery, sometimes it is not possible to get labour on time.
So i want to grow it for few months in the conditioned environment, later i will move it to my garden.
Thanks and Warm Regards,
K.Eswaran
Hello GG, Have spent the entire morning going thru your blog. Its great and wow what work you put it. I love gardening and try and do everything in my small balcony. Everyday I come across new things like growth promoting harmones, liquid fertilizers etc. I live in Delhi and I tried a local garden shop and nurseries, the workers there have no idea what you are talking about! By any chance do you have any idea from where you could order these. Even coco peat and potting mix which is so useful for terrace gardening being lighter than soil I have not come across it here until now.
Thanks in advance.
Regards
Priyanka
Hi
I’m in bangalore , Where to buy quickroot ? address or nursery name would be helpful.
nice blog.wanted to start my own balcony gardening n didn’t know how.your blog on gardening was quite interesting.hope to follow it regularly n stay informative .thanx
RHS Plant Propagation
The Royal Horticultural Society does books on any number of gardening topics and many of them are quite dry, but I recommend this one: “Plant Propagation”.
Many types of propagation are really quite scary particularly stem and root cuttings. After all if you are taking cuttings it is because you really like the plant and you want more. These are not ideal conditions under which to persuade someone to hack it to pieces.
“Plant propagation” helps dispell some of that fear by pretending that the subject is deeply scientific. It is a factual no nonsense book that spells out why and when you need the different forms of rooting hormone as well as difficult things like how to use fungicides and when to take cuttings of hardwoods and evergreens. It rather reminds me of my old games mistress. When she said that running round the field was somehow good for me I was tempted to believe here even though I knew deep down that a hot water bottle and bar of chocolate had to be a better option for a winter afternoon. Anyway I digress.
There are some techniques, like growing Lillies from bulblets on the stem, that I don’t think I will be doing any time soon. But the book has expanded my repertoire, tempting me to layer any plant that I can persuade to lie down long enough and divide anything that seems to have more than one crown at the surface.
I particularly like the Rupert Bear format : each page shows a “how to do it” diagram with a bit of text giving a basic breakdown of the procedure, whilst underneath is the geeks version for the professional plantswoman.
Now why can’t IKEA learn to write instruction manuals like that!
Hi GG, first thanks for your time and sharing such information. I am from Bangalore. I have tried with Keradix, but not so happy. after waiting for a month my hibiscus plants could not grow roots. Now planning for the quick root. Could u let me know where the quick root is available in Bangalore? I purchased Keradix from a nursery where quick root is not available.
Hi GG, thanks for such nice guide. I wish to know where can I get the rooting hormone in Bangalore?
if there is any shop , please let me know the address and contact. I have spoken to a person and he said Bayer rooting hormone is more effective. Also tata products are good. please let me know if I should purchase powder or liquid?
Shruthi
Shruthi
We have rooting hormone at our store ‘Garden Guru’. Please do contact us.
Regards
GG
Hi GG,
Wanted to know if I can grow “Frangi Pani” with this stem propagation method?
found these links on the web…. you could help me explain further.
http://www.homeimprovementpages.com.au/article/Growing_Frangipani_Trees
http://www.sacredgardenfrangipanis.com/frangipani_growing_advice.php
http://www.thefrangipaniman.com/Growing.html
Hi GG,
Your blog is such an inspiration to me..
Can you please tell me where I can buy Quicroot solution/powder from?
I am also looking for Bavistin, Captan/Blue copper and Dithane.
If you can suggest me where I can find these in Bangalore, it will be great.
Thanks,
Jincy
hi
where can i get rooting hormone in cochin, kerala. and i what name is it available there . greatly appreciate your help
thanks
reshma
you can get it from my online store: http://gardenguru.in/
Thank you
I want to grow rose plant from another rose plant by cutting of stem what can i do i didnot have rooting powder
[…] How to grow Coleus from cuttings […]