Pollination and its importance
Without pollination, you can’t have the fruits of your effort (pun intended as always ;-).
Pollination is a process where the pollen from the male parts of the flower are transferred to female flower or female parts of the flower. This step has to happen for fruit set to happen. In nature, this happens in multiple ways. Bees do most of the pollination and pollination by wind also happens. But when you are growing plants in a greenhouse or a closed environment where bees can’t enter and there is not a lot of wind, the grower needs to help in the pollination process.
This post is about a pollinator that can be used to pollinate flowers that have their male and female parts in the same flower. These are called Bisexual flowers. Now you may ask! If both the male and female parts are in the same flowers then what’s the problem? why cannot pollination happen? Well, the reason is, though the different parts are in the same flower, there needs to be some external help in moving the pollen to the female part of the flower, the ovary. This is done by wind, directly or strong movement of the plant caused by wind.
In cases where there is no wind, like in a greenhouse where plants can be almost stand still for most part of the day, we need to simulate such actions and hence we cause the pollination to happen by causing vibration or vigorous movement to the flower.
Enter DIY flower pollinator..
This flower pollinator is a simple tool that causes vibration of the flower stalk resulting in pollination.
Materials required for building DIY pollinator
- An Eccentric headed motor 3-6V. – 1 nos – INR 50. An eccentric head is nothing but a semicircular shaped attachment connected to pump to cause the vibration.
- AA battery holder – INR 15
- Small switch – INR 15
- Connecting wires – Had them lying around
- Metal Rod (slightly flexible ) – I used a piece polyhouse zigzag spring wire
- Enclosure box – got it free for an electronic component I bought – INR 10
- Hose clamp to hold the motor on the metal rod.
Building the DIY Pollinator
The easiest is the building part.
- Make a hole in the enclosure box to fix the switch. Place the switch in the slot made.
- Solder wires to the battery holder and place in the box too.
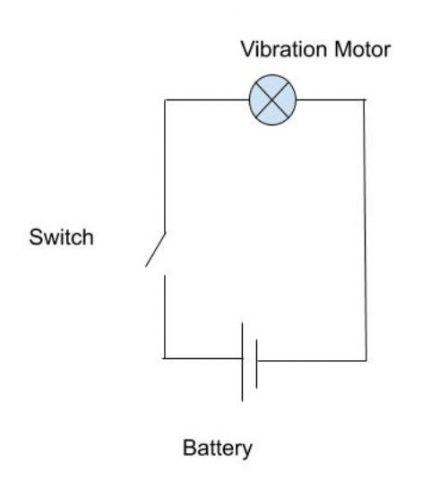
- Solder the wires from the battery holder to the switch and from the switch to the motor and from motor back to the other terminal as in the connection diagram. The polarity of the motor doesn’t matter. We want it to just spin. Any direction is OK.
- Fasten the motor on the metal rod/zig zag wire in my case. Remember the rod should not be too strong. It should vibrate when the motor runs.
- I used a hose clamp to hold the motor on the metal rod.
The circuit is very simple. Just follow the diagram below.

DIY Pollinator – Eccentric Head
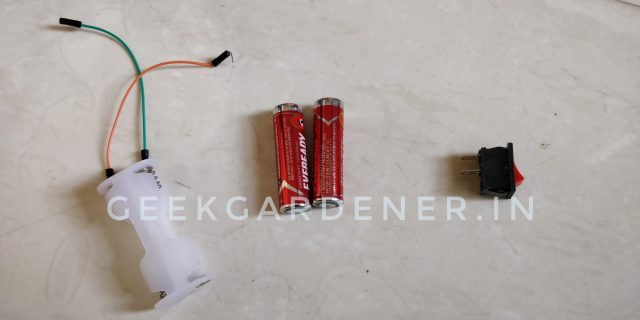
DIY Pollinator Parts Batteries, Holder and Switch

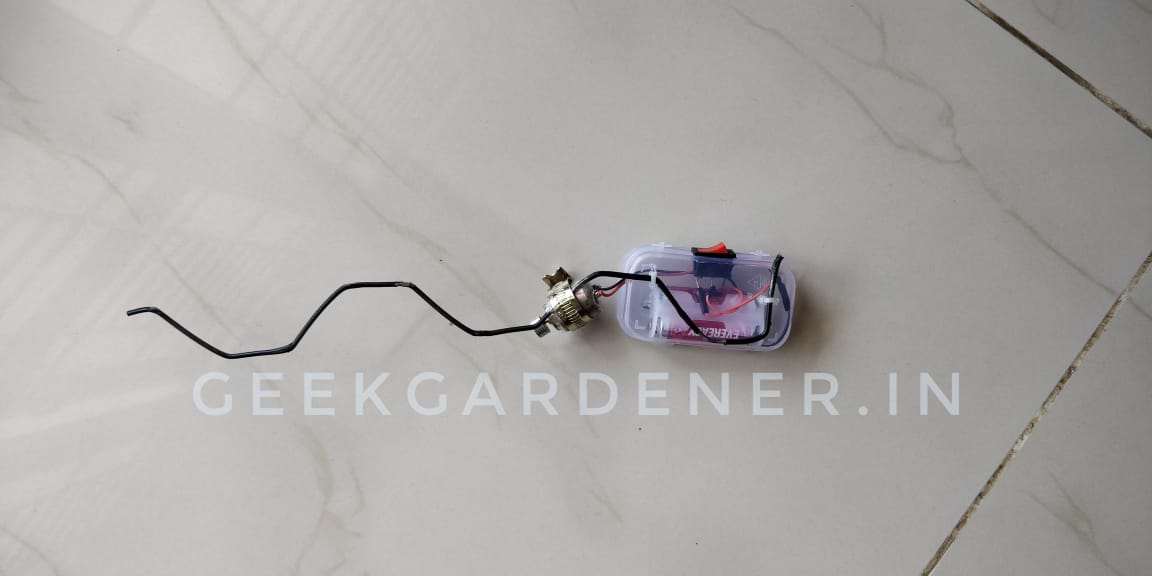
Completed DIY Pollinator
DIY Pollinator Completed.I know there aren’t too many steps captured. I built this over an evening and captured only a few steps.
If you have any questions or need some more information do write in the comments.
Testing the Pollinator
Pollinator in action on the field. You can see the brinjal flower can’t thank us enough 😉
Go ahead, make your own versions and post it here (or should say Show off here?)


4 Responses
Good Video Mani. Would be even more helpful if you can provide the links to buy them online.
Thanks Srikanth. I will post the links shortly. I picked them up in shops. I will find out the equivalent online products and update the post. Good to see your comment.
The motor is very similar to the ones here. The rest of the materials are better bought from a nearby electrical store. Hope this helps
https://www.roboelements.com/product/3-9v-small-dc-vibration-motor/
https://hacktronics.co.in/mini-dc-motors/large-vibration-dc-motor
https://hacktronics.co.in/mini-dc-motors/large-vibration-dc-motor-with-round-head
Hi,
Thanks for the great info.
Could you please show a step by step guide for the assembly?
also whats the motor rating and rpm?
Thanks